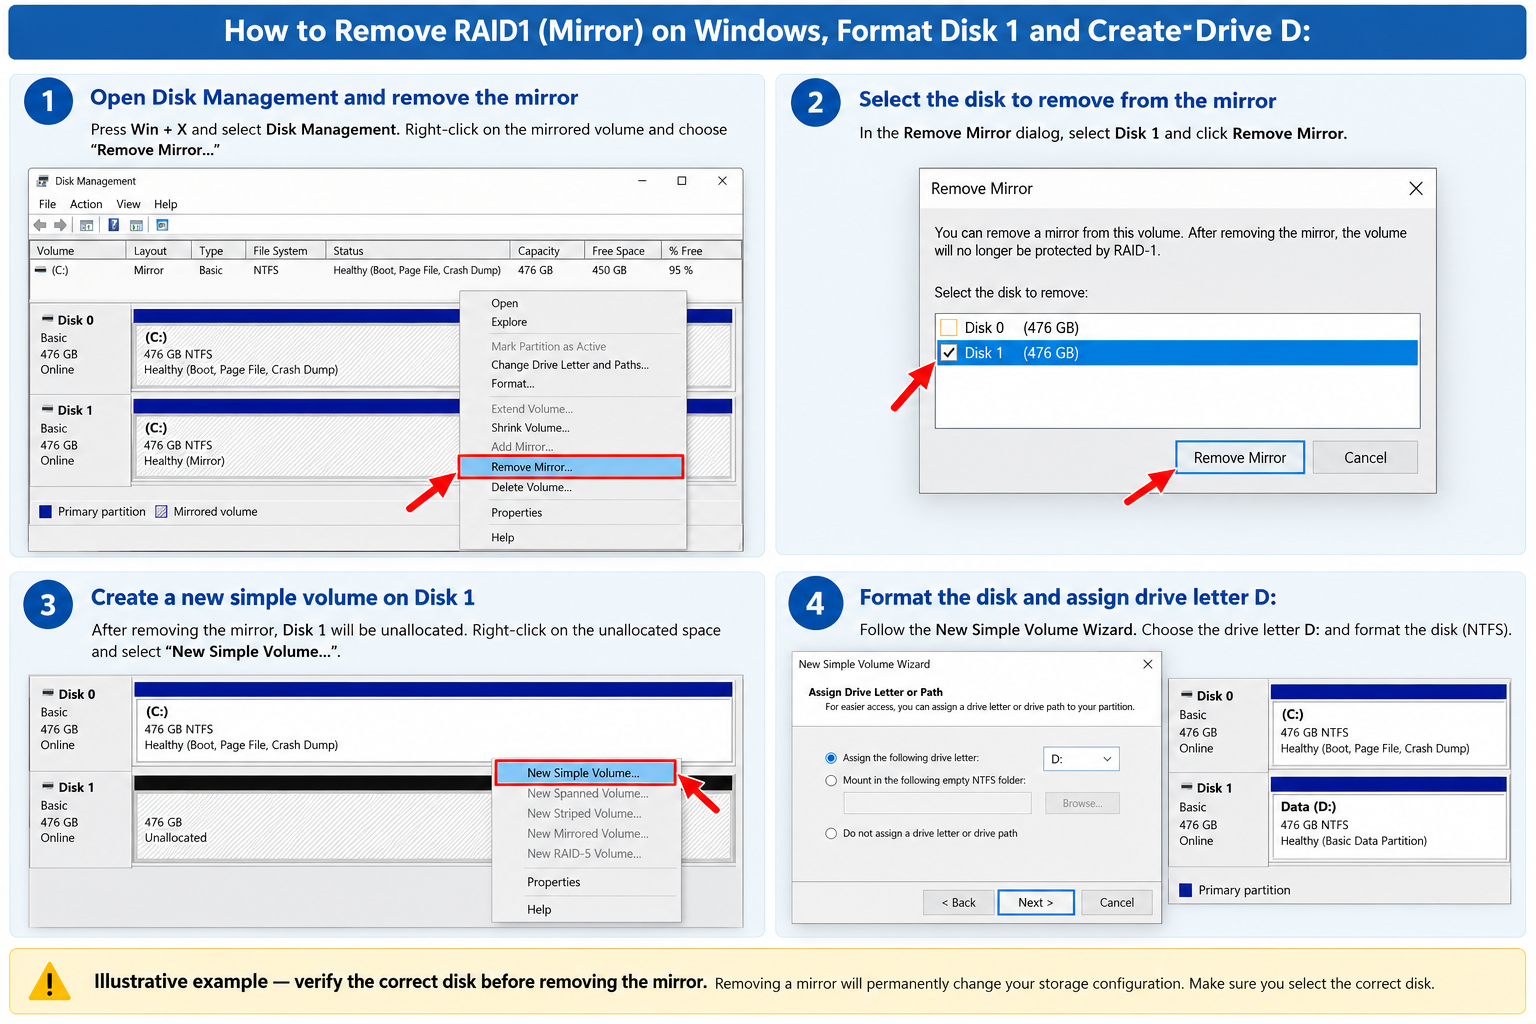
This guide explains how to remove Disk 1 from a Windows software RAID 1 (mirrored volume), format the released disk space, and create a separate D: drive.
Important: This guide applies to software RAID 1 configured in Windows Disk Management using dynamic disks.
Warning: Removing the mirror will delete the mirrored copy from the selected disk. Before proceeding, make sure that Disk 0 contains the working copy of your operating system and data.
Step 1. Open Disk Management
Log in to the Windows server using an administrator account.
Press Win + R, enter:
diskmgmt.msc
and click OK.
You can also right-click the Start button and select Disk Management.
Step 2. Locate the RAID 1 mirrored volume
In Disk Management, locate the mirrored volume.
The same volume should be displayed on both Disk 0 and Disk 1.
Before continuing, make sure that Disk 1 is the disk you want to remove from the mirror.
Step 3. Remove Disk 1 from the mirror
Right-click the mirrored volume and select:
Remove Mirror…
Do not select “Break Mirrored Volume”.
In the new window, select Disk 1 and click Remove Mirror.
Confirm the operation.
Windows will keep the original volume on Disk 0 and remove the mirrored copy from Disk 1.
After the operation is complete, the space on Disk 1 should appear as Unallocated.
Step 4. Create a new volume on Disk 1
Right-click the Unallocated space on Disk 1 and select:
New Simple Volume…
The New Simple Volume Wizard will open.
Click Next.
If you want to use the entire disk, leave the maximum available volume size selected and click Next.
Step 5. Assign drive letter D:
Select:
Assign the following drive letter
and choose:
D:
Click Next.
If the drive letter D: is already in use, you will need to free it first or select another available drive letter.
Step 6. Format the new volume
Select:
Format this volume with the following settings
Use the following settings:
- File system: NTFS
- Allocation unit size: Default
- Volume label: Data
- Perform a quick format: Enabled
Click Next and then Finish.
Windows will format the disk and create the new volume.
Step 7. Verify the new D: drive
Open File Explorer → This PC.
You should now see the new drive:
Data (D:)
The disk is now ready to use as a separate storage drive.
Result
After completing these steps:
- Disk 0 remains your main Windows system disk.
- RAID 1 mirroring is disabled.
- Disk 1 is available as a separate disk.
- The new volume is formatted as NTFS.
- The disk is available in Windows as D:.
Important: After RAID 1 mirroring is disabled, the data on Disk 0 is no longer protected by a mirrored copy. We recommend keeping regular backups of important data.